|
The showhouse in Nashua opened earlier this month and it has been a huge success! The organizers have done a wonderful job at keeping all of us designers informed, securing press coverage, and managing all of the millions of details that are involved in choreographing such a huge endeavor!
The house looks amazing, with each room displaying a different vision and taste of the designer/s that were assigned to it. Each is beautiful in its own way. My sunroom seemed to be well-received at the open house that kicked off the month-long exhibit. I spoke with several visitors, answering questions and hearing their comments. It was nice to have that little boost of confidence, never knowing how a space will be viewed by guests. As we wind down and get ready to empty the rooms, I will be bringing home less than I went with. Yay! I've had some purchases from the room. In this last week of the show, I'm hoping to sell more of the larger pieces, but we'll see. The pieces will remain for sale and up for grabs after the show has ended. If you haven't already seen it, it's worth taking a ride to 90 Concord Street in Nashua to tour the showhouse. It was a gorgeous house to begin, but with all the work that went into it this summer, it looks spectacular! Get your tickets here, or you can buy them at the door. Enjoy!
0 Comments
It has been the better part of a year since I was first introduced to the idea of the 2018 New Hampshire Designer Showhouse. I've been excited since the beginning, but my excitement is hard to contain now that the house is opening to the public in less than a week. Like planning a wedding, designing my space has been a process. The planning, the research, the decisions, the logistics. There is so much that goes into designing a beautiful and functional space. And once all my ducks were in a row, I waited. I waited for the day I could move in. Then the madness began. It was a crazy couple of weeks while I moved in all of my items and began to set up. I saw other designers around the property and wondered how their rooms were coming along. We seem to be an eclectic group with varied styles, so it should be interesting. I'm guessing that was the goal of the organizers–to introduce a wide range of styles into the home. After several visits, many hours, and a lot of rearranging, my design is finished! And I'm really excited about how everything turned out. The showhouse is open from August 2 - 31. Get your ticket here. 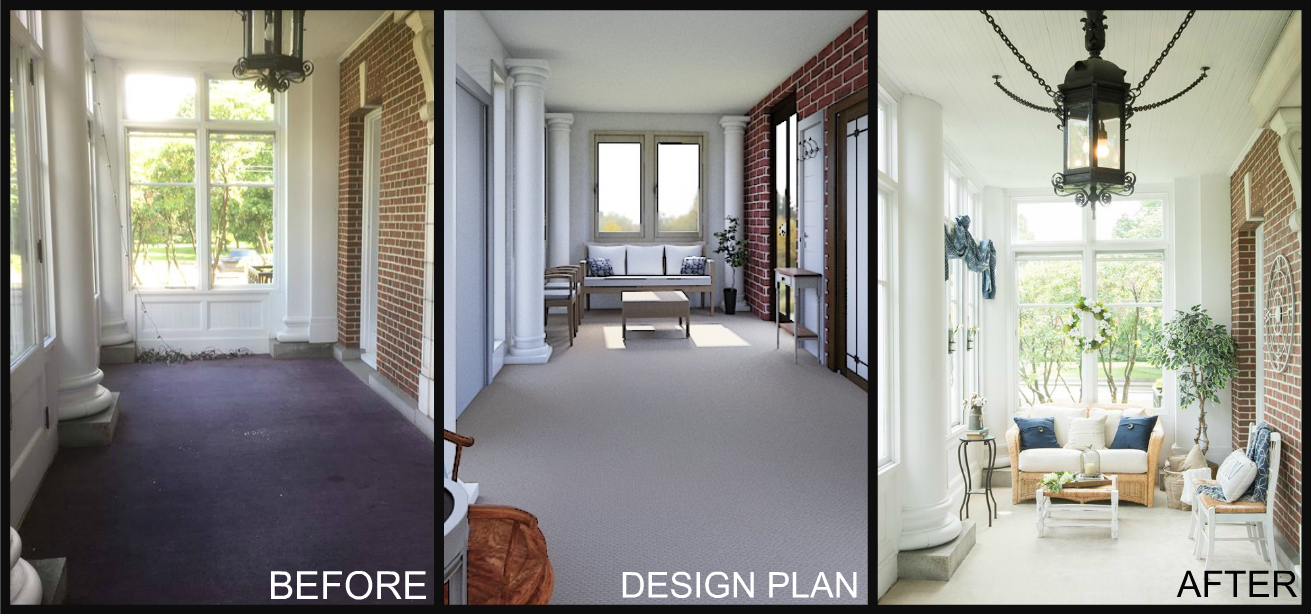 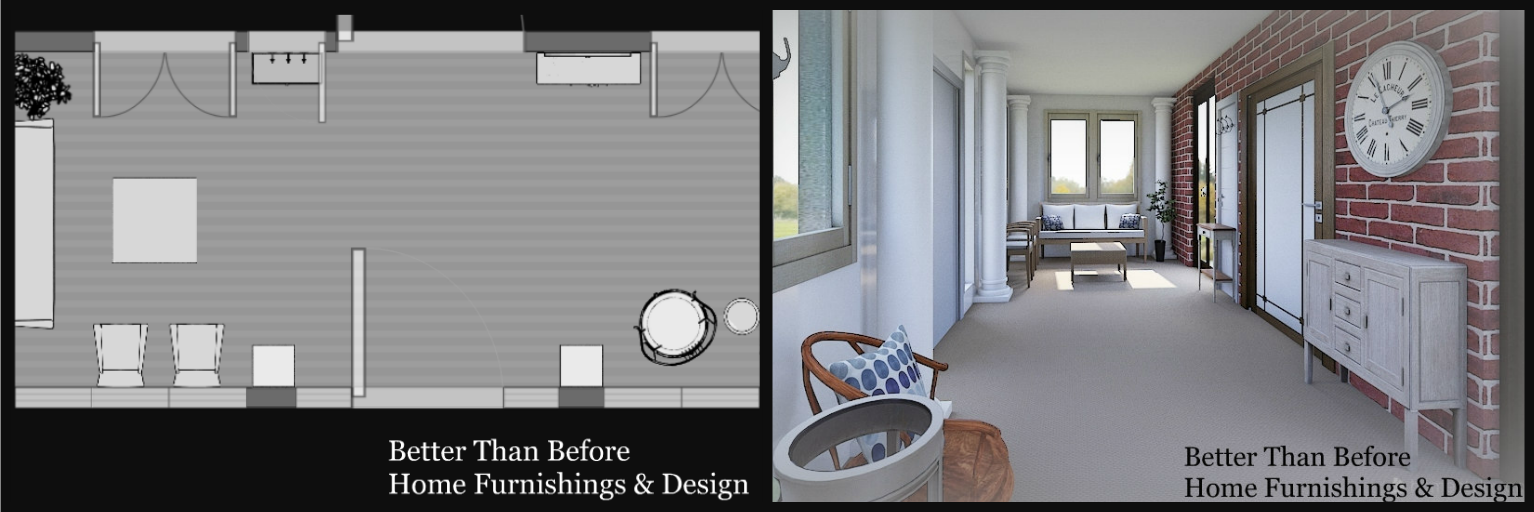 By now you know that my proposal was chosen for the sunroom in the designer showhouse. Woohoo! The project that came out of nowhere, at just the right time, is coming to fruition! I attended several designer meetings with the talented group of folks who are transforming the rooms of this beautiful estate into refreshed works of art. I asked questions and gained some insight through others who have participated in showhouses in the past. There were some things that I assumed, and other things I learned. One of the biggest realizations was that anything I needed for my space would either have to be donated, loaned, or paid for out of my pocket. Hmmm... I guess I'll have to figure that out. Since I'm a small business, I would like to give other local "little guys" some PR and hopefully some business will come to them, too. I visited local shops, searching for items that may work well with my design. I had some great conversations with shop owners and managers, ended up making some great connections (and purchases), and walked away with some wonderful opportunities. Ron at Integrity Flooring and Interiors in Kingston, NH offered to donate his time and materials to replace the dirty and outdated carpet in the space. Carolyn Leiter from Revived in Derry, NH has offered to loan some items and make centerpieces to fit my French Country theme. Diane from "Finer Things" With You In Mind, a seamstress in Auburn, NH, sewed new seat cushion covers for a loveseat I found. Nora Fiore is using her crafting talents to create a special wreath to warm up the room. And I will have Jen at Jen Webber Photography out of New Boston, NH take some shots for marketing purposes when the room is set up. Worried that I wouldn't be able to borrow the "right" pieces for the look I wanted, I began purchasing and refinishing items to use in the space. I'm a planner. I wanted to be sure that I had a cohesive room where all items work together to be the comfortable, welcoming, and relaxing French Country cottage look I envisioned. Here is my room layout and rendering... At this point, new carpet has been laid, my family room looks like a showroom itself with all of my purchases, and I'm just waiting to deliver and set up. It's very exciting! If you're interested in taking the tour this August, you can purchase tickets here. Early bird tickets are available now. The price increases by $10 after August 1st. 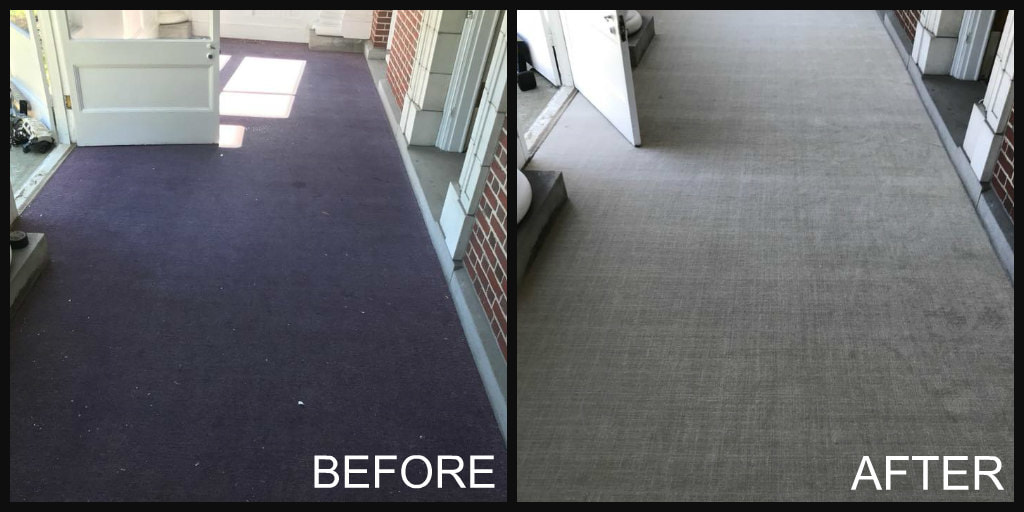 Last spring I left my full-time job to work on building Better Than Before into a full-time, sustainable business. It was an exciting, but stressful decision and I had a lot of sleepless nights leading up to it. I was in for a long ride and a lot of work. But I was thrilled to have the opportunity. And then the letter came. I’m not sure how they found me, or why they chose me, but as they say, things happen at the right time, for the right reasons, and when you’re ready to receive.
I received an envelope in the mail, addressed to me and the name of my former side business. I had closed down that business several years ago when I realized that working a full-time job and trying to stage homes with Realtors and homeowners wasn’t feasible. But now, things were different. Although I was no longer staging homes, decorating them was in the same ballpark, and I had all the time I needed, so I was willing to see what this was all about. It’s in my nature to be skeptical, so I read the invitation with a grain of salt. Then I did some research and realized that this was a thing! A legitimate thing! I was being invited to submit a proposal to design a room in a mansion! What the holy hell?!?!?! Then the thoughts started to swirl crazily in my head, as they typically do when I’m overwhelmed or introduced to a problem that needs to be solved. Ok, now what? How do I do this? What exactly do I submit? Do I need credentials? Are there professionals that I’ll be competing against? How long do I have to prepare? How the heck does this even work? Can I even do this?! Then I took a breath. There was a designer open house coming soon where I could see the house, ask questions, and meet the other prospective designers. And there was always Google. This is what I wanted! I didn’t know that I wanted it until it fell into my lap, but this is exactly what I needed to work on. I've never been involved in something like this before, but I’d figure it out, one way or another. Fake it until you make it. Dress for the job you want. And all of those other clichés. And then I started to get excited (to put it mildly). Aside from being the type of project that could possibly launch my decorating business beyond just family and friends, this was a fundraiser for a Hospice House. The cause is close to my heart because we relied on hospice services for my brother when he was terminally ill. There will be a little piece of him in this project, as there is in my business as a whole. He was the person who inspired me to give it a go. And I hope he’s looking down from wherever he is and realizes that. Follow me on my journey as I update my blog each week with the latest developments. *To check out the event, click here. Your home is an extension of yourself. The way that we decorate is a reflection of the things we love, and what makes us comfortable. As our tastes or needs change, so does our décor. For some of us it happens more often than others. (You know who you are!) But for others, it happens less often for a number of reasons.
I believe that one of the biggest reasons more of us don't redecorate as often is because the thought of it is overwhelming. Where or how do I begin? By following five simple redecorating steps, it's really pretty simple. Read on and find a simple outline you can follow to freshen up a space, or create a new space in your home, without all the stress. 1. Get clarity Be sure that you have a clear vision of your needs and wants for your space. How will the space function for you and your family? Will it be a quiet space to relax, read or chill out? Is it the place where the kids will hang out and play? Will the family sit and watch TV there? Or does it need to be a multi-functional space, serving several purposes? 2. Determine your needs Once you know how you will be using your space, you can begin to determine what you will need for it to function properly. Your needs will be different for a craft area than they will for a playroom. Things like seating, storage, and lighting are considerations. You may have some of what you need, but this is the time to make a list of pieces that you may have to find or purchase. 3. Find inspiration There are so many ways to gain inspiration. Even if you have an idea of what you want or need, taking a look online at similar spaces can give you a different perspective, or ideas that you may find helpful. You can find inspiration in so many places, like Pinterest, magazines, from a piece of artwork or furniture, or even from a friend's space. You may find colors, styles or actual items that you want to incorporate into your space. 4. Shop around your house When you know what you need and want, and have some inspiration, you may actually find that you already own some items that can be used in your freshly decorated space. Look around your house, attic, basement, and garage. Think out of the box. There may be functional pieces that can be used as is, or would be perfect with a little freshening up. The dresser that you have stored in the basement could be a great piece in an entryway to hold hats and mittens. The small side table that you inherited from a family member could be painted and used in your new reading nook. An old lamp could use a new shade and have a completely new look. It's a great way to save some money and create your new space. 5. Consider your budget It's difficult to move ahead if you don't have a budget. When you know how much money you have to spend on your new space, it's easier to make decisions on what to buy, or even where to shop. Your budget may not stretch far enough to purchase everything you'd like at this time, but some things may be able to wait. If you really can't wait, then you may have extra motivation to find bargains at discount stores or yard sales, or even in your home. There's no need to feel overwhelmed when redecorating your home. By being strategic and organized, it can actually be a lot of fun. If you still don't believe me, there may be a friend you can ask, or a service you can hire to consult on your project. The bottom line is that your home should function properly for you, and it should reflect what you love. It should be your retreat, your castle, and your sanctuary–by whatever means you need to get there! Happy decorating! ~Kerri Painting furniture is so much fun! Well, it can be. Sometimes it’s quite stressful, if things don’t go well. There are several mistakes that beginners typically make when painting furniture that can add to the stress. By taking care to be prepared and follow some simple rules, things will go much more smoothly.
FURNITURE PAINTING MISTAKE #1: Judging a book by its cover. I know it’s tempting to just walk away from a piece of furniture because it looks ugly. Or toss a piece to the curb if you're tired of looking at it or want something new. But a well-made piece of furniture is a treasure. And when the piece is also a functional addition to your home, all the better! Some of today’s furniture found in stores is made of a composite material, like particleboard or medium-density fiberboard (MDF) with a laminate or veneer finish. Others have parts made of plywood. You can still paint those materials, but they won’t last like a good ol’ solid wood piece of furniture. Don’t worry if it’s scratched up, stained, chipped, has nail polish on it, or is just finished in a way that doesn’t appeal to you. All of that can be fixed, and when you’re finished with it, it will have a completely fresh look. And keep an open mind. Just because it was created for a certain purpose, it doesn't mean that it can't be used in another capacity. FURNITURE PAINTING MISTAKE #2: Waiting to make repairs. If your item has a loose leg, a drawer that doesn’t quite close properly, or has a few dings or holes, fix it before you get started on refinishing. Most times, repairs are easier to do before painting. Sometimes the repairs require more work than you expect. I highly recommend making larger repairs, like fixing broken legs or drawers, before you begin painting or you risk chipping or otherwise damaging your freshly-painted finish. FURNITURE PAINTING MISTAKE #3: Skipping the prep. Prepping your piece isn’t the most fun you’ll ever have, but it is sooooooo worth it. And you will likely save yourself some aggravation, money, and/or time. By taking care to prep properly, it will set you up to have the best possible final result. The first thing you want to do is to clean the furniture thoroughly. You want to have a surface clean of all dirt and oils. If you plan to use chalk paint, this is typically the only prep you’ll need. Chalk paint is able to adhere to and cover most surfaces without sanding and priming. Not always, but most times. When using a latex paint, you’ll need to spend some time sanding and priming the surface so that it accepts and holds the paint. Some latex paints include primer right in the paint. Personally, I still like to use a separate coat of primer. And, don’t forget, you can get primer tinted for better coverage if you’re using a dark paint color. FURNITURE PAINTING MISTAKE #4: Not allowing time to dry. I know that it’s exciting to finally start to paint your piece, but slow your roll. Allowing each coat of primer or paint to dry thoroughly is so important. If you attempt to touch up or apply another coat too soon, the finish will still be tacky and you’ll give yourself more work to fix the patches or uneven coat. Chalk paint tends to dry a lot faster than latex paint, which can be a good or a bad thing. You can apply multiple coats in less time than it takes for latex to dry. But it is less forgiving and you have to work more quickly. FURNITURE PAINTING MISTAKE #5: Not protecting your piece. Adding a layer or two of a protective coating over your paint finish will help protect your piece against any wear and tear. There are lots of different products and finishes that you can choose, depending upon your piece and the look you desire. Chalk paint has a flat finish and needs some sort of a top coat or finish to protect the piece against damage to the paint. When chalk paint was first introduced, wax was the only option for a top coat. But today, there are many other options that aren’t as labor-intensive to apply. Some paints have a topcoat built right into the paint. And you have your choice of several types of finish, from a low sheen to a very glossy look. If you’re painting a piece that will have lots of use, like a kitchen table, you may want to add another coat or two of a sealer on top of the paint. Note: Top coats can sometimes take a couple of weeks to cure. Although the surface may feel dry, you may want to let it cure for several weeks before putting any items on top of it.  We all take pride in our homes. But our tastes change. And sometimes we want to replace or add to pieces we have. And other times we just get bored with what we have and want new items. It sometimes take a little creativity, but decorating your home doesn't have to cost you a fortune. I'd like to share some of the ways you can get a new look without breaking the bank.
Redecorate your home on a tight budget Tip #1 - Paint You've heard it before, but it's true. One of the easiest and most cost-effective ways to make a big change in the look of your space is by painting your walls. A nice, clean, fresh coat of paint does wonders. If you plan to paint a drastically different color on your walls, I suggest that you invest in several sample colors, paint a block on each wall, and live with them for a week or so. It will give you time to see how the light changes throughout the day, how it affects the color, and whether you are happy with it. Redecorate your home on a tight budget Tip #2 - Small details When planning a room design, you typically begin with the biggest items and fill in the smaller ones after. The largest items are the ceiling and walls, flooring, and furniture. When choosing colors and finishes, I like to keep them neutral. By adding pops of color and texture in the smaller items like pillows, area rugs, window coverings, and other accessories, it will be much easier, and less expensive, to change out those items for a different look. Swapping items from room to room may also be an option. If you love what you have, use it. Using artwork, décor, lamps, rugs, or other pieces in a different area or grouping could give them a whole new look. Redecorate your home on a tight budget Tip #3 - Repurpose and refinish Many of us have furniture pieces that we don't love but serve some type of function. Sometimes they're hand-me-downs. Other times, they've just worn out their welcome. But, for one reason or another, we hang onto them. It takes time and money, and sometimes a lot of patience to find a new piece worthy of your commitment. And you may not have to! If you're lucky enough to have a well-made item that is, or can be, functional for your space, use it. Shop your house. Your basement. Your attic. Look at your own inventory. Look at the lines of each piece. Think about each item in terms of the function you need and not necessarily what it was built to do. If it's not the right color or finish, most times that can easily be changed--and for a fraction of the cost of a new piece of furniture. There are so many ways to decorate your home on a tight budget, but these are a few of the easiest and least expensive. Even if you decide to go out and buy new furnishings for your home, there are still things you can do to keep costs down. Hmmm... I may just have an idea for my next blog post.  Do you have a child who will be leaving for school soon? Are you anxious to get into his/her bedroom in hopes of giving it a makeover? It would be fun to give your child a newly-designed space for weekend visits. But I would caution you that it may not be the best idea to make it a complete surprise.
Before your student moves out, work with her to de-clutter closets and storage spaces of clothing and memorabilia. You don't want to make assumptions yourself and donate or toss anything that she isn't quite ready to part with yet. Cleaning out the bedroom will not only give your child a head-start on getting ready to pack for school, but also help in your quest to make the space over. Moving out of the house can be an emotional time for your child. Holding on to certain memory-evoking items--and even taking them to school with her--can help ease the transition. Putting together scrapbooks, photo albums, bulletin boards and memory boxes are great ways to corral these items and keep them safe. It may be a project you can work on together, or maybe give her as a going away gift. Once all of the personal items are cared for, you're able to begin the actual transformation of the space. Giving the room a good cleaning and painting will be much easier after it is de-cluttered. You may be able to eliminate some of the furniture in the room. Talk to her ahead of time about how she will need the room to function and determine exactly what pieces she will need. Will she need more than a bed and dresser? Will she be doing homework and need a desk? A bookcase? A comfy chair? You will not only be creating a great new space for your child, but also, in a way, helping yourself transition through this next step in her life. Have some fun. 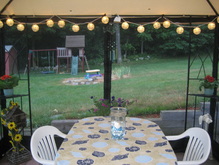 It is finally warm enough for us to entertain outside and enjoy our outdoor spaces. Each year when I set up my patio, I feel that I want to replace or reinvent some of the pieces I own. I haven’t yet had any free time to start, but this year I have decided to make some big changes. I don’t have my plan completely laid out yet, but I’m taking notes and beginning this project like I would with any other room in my home.
I have a beautiful metal gazebo that fits perfectly on my patio. I’ve been hauling that thing in and out of my shed for the last 3 or 4 years, setting it up with step stools and a balancing act, and decorating it to be not only functional, but pretty and cozy. Then in the fall, I take it back down, again looking like I’m performing a circus act all the while. Although it looks beautiful when it’s constructed, complete with mosquito netting, lights strung inside, and planters holding colorful annuals, we hardly use it. I tried to make it a space where my family would hang out on beautiful summer nights, enjoying the sounds of nature without having to worry about mosquitoes, but to no avail. Like I always say, if there is a space in (or out) of your home that you don’t use, it’s wasted space. Time for a change. First things first Like I would with any room inside my house, I first have to determine how I need the patio to function. I know that we’ll keep the grill and fire pit there. The fire pit is a new addition since last year, so my husband does spend more time out there now. We sometimes eat on the patio, and if we have visitors, we’ll sit out if it’s not too hot or cold. So now I know that we will need at least some portion of the patio that is not enclosed (for the fire pit and grill) and would still like to have a covered area to sit because there is no shade. Layout Thinking about my intended function for this space, I’ll make a sketch of the patio and place the grill and fire pit first. Because of the importance of the placement of these two big items (because of the fire hazard), the layout of the remaining pieces will revolve around them. With those pieces taken care of, I’ll determine where it makes sense to place a table and chairs. I’m also thinking about having a small, separate seating/conversation area, and probably a table near the grill for food preparation. I may need to come up with two or three different layouts, based on different functions or needs, to see what may work best. Inventory I will have to take inventory of the pieces I already own. I also like to have measurements for each piece. Once I come up with a layout, I will see which of my existing pieces may work, what may not work, what I may be able to repurpose or what may need to be purchased. I will also look around in my garage, shed, in my house, and at yard sales if I am looking for any other specific pieces. Once I know what my layout will look like and I have the furnishings that I need, I can start accessorizing. This is the fun part. Flowers, tablecloth, outdoor carpet and lighting are some of the accessories that can help pull the design together. Whether you are decorating inside or outside, the basic principles are the same. Determining the intended function of the space is the foremost decision to be made. Once you know what you expect from a space, the planning becomes easier.  When interviewing for a new job you want to put your best foot forward. You pull out your "interview outfit," update your portfolio and résumé, and get all your answers ready for those tough questions. You want to be sure that you are perceived as the best candidate for the job. You want an employer to just HAVE to have you on board. And, of course, you want to be able to collect the highest possible salary for the position. Do you think that all would happen if you walked into the interview looking unkempt with a shoddy résumé and terrible communication skills? Of course not! Then why let your home interview without preparing properly? When you list a house for sale, it is essentially on display and "interviewing" to be someone's home. Buyers, like employers, look for the perfect candidate. A house that is clean, updated and beautifully staged will be perceived as being well-maintained and move-in ready. It will therefore demand a higher asking price than one that isn't. Showcasing the home's positive assets and showing the target buyer what life would be like in the beautiful home helps them to make that all-important decision to purchase. Why take chances with what is likely a homeowner's largest asset? Prepare the home and prepare well. It will pay off in the end. Don't let your listing's photographs turn off a buyer. Wow them and entice them to come for a personal tour. |