|
When I was chosen to design a room in Nashua's historic Anderson House in 2017 for a fundraiser, frankly, I was extremely honored, but also quite surprised.
You see, I'm not an interior designer. I'm an interior decorator. Many people use the two terms interchangeably, but they’re very different. I was among designers who had been in the industry for years. Some even owned their own businesses. They had many years of experience, lots of industry contacts, and staff to help build out their vision. I had been certified in interior decorating for several years and, until now, it had been just a side hustle. I had left my corporate job a few months before this opportunity arose, and was trying to determine in what direction I would take my decorating business. I had no contacts. I had no staff. I just had a vision and a passion. Despite my subconscious trying to tell me that I was an imposter trying to play with the “big kids” in this design house project, I was excited at the opportunity. After all, the fundraising committee had awarded me the project and, apparently, they had faith in me and my vision for the sunroom that I had chosen to design. The one thing that set me and my design apart from the other designers was that this sunroom would be created with reclaimed materials–at least 95% of the pieces, anyway. That’s my brand. And that’s what I love to do. Reclaim, refresh, repurpose, recycle. For almost a year, I pulled together furnishings based on my vision and plan. I had made some wonderful contacts that helped to replace the carpet, sew cushion covers, and lend me some new pieces of décor for the space. I also created and built some items to use in the space as well. In the end, the sunroom was exactly how I pictured it. I loved it! Before the public opening, I was able to walk through the entire home and take a peek at the other designers’ spaces. It left me feeling like an imposter once again. I tried to convince myself that my insecurity was only in my head. Not every one of the rooms was exactly to my liking. And my room certainly wouldn’t be everyone’s favorite either. That’s the great thing about design. There’s a style for everyone. But each of the designers who visited my sunroom were so kind and encouraging and very positive about my work. The day of the open house came and I was able to be there, in my sunroom, to answer questions and, more importantly, hear the comments from visitors. My feathers certainly fanned when one visitor told me, “This is my favorite room in the house.” I learned so many things about myself and my business through this experience. I learned that I should not listen to my inner critic. I do have an eye for design. And through my lens, I have my own style. There are people who will love it and others who will hate it. I just have to find the ones who love it and create for them. My thoughts around reclaimed design were confirmed. There are beautiful items that can be reclaimed, refreshed and/or repurposed to become an important element in the design of a space. And not only is it a more affordable option, but also an eco-conscious one. There are so many other learnings from my journey with the Anderson House project. And the decision to build my business around upcycled design was the most important learning. There’s room for all types of design. And each one has its place.
0 Comments
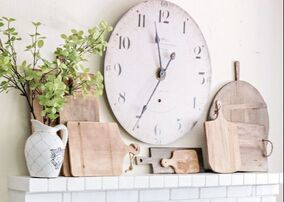
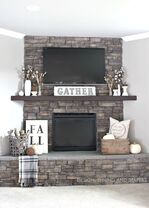
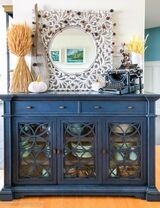
 Why do we have such a hard time decorating our mantel? I do, too, and this is what I do for a living! My mantel is the toughest of all. Maybe it's because I'm used to looking at it and I'm sick of my furnishings. LOL! Well, in any case, I have some rules of thumb to make things so much easier for you. You want to keep 3 things in mind: 1. Your anchor. 2. Weight. 3. Filler. Anchor What is an anchor? The anchor will be the largest/tallest piece/s that will sit on or above your mantel. It is a piece that has the most visual weight, takes up a considerable amount of space on the wall above the mantel, and will balance the firebox for the upper portion of the wall. Examples of an anchor: TV, mirror, artwork, clock, or any other large piece of home décor that you love. You can even use two (or more) complementary items that will group together to become your anchor. You can create some asymmetry by place your anchor piece/s off-center (as shown above), if you'd like. Asymmetry creates some interest, and with other pieces you will see that it works beautifully and as well as if you center it on/above the mantel. Weight Now that you have placed your anchor piece, you will need to add some "weight" to the left and the right of it. I'm talking visual weight here, not necessarily physical weight. We need to take up some space with items on the left and right of the mantel. These objects do not need to be identical, but should carry the same visual weight and height. They should be shorter than your anchor piece and visually take up roughly the same amount of space. Again, you can group two or three items to achieve this step. Take note of the scale of the pieces. You want them to be able to hold their "weight" with the anchor piece without looking too big and bulky or too lightweight. As well as the scale, you want to be aware of the shape and color of the items. There should be some contrast with the anchor and whatever else is on the wall. You don't want the pieces to get lost or get too matchy-matchy. Filler The filler will be the smallest pieces on your mantel. These pieces will add more color, shape and interest. To create a clean, minimal design, you can skip this step altogether. It's totally up to you and your style. When using filler pieces, use items in varying heights to avoid creating a horizontal line across the mantel. You can always add a book or a short candlestick under a very small piece that would otherwise be too tiny and get lost. Some other quick tips: - When looking at the completed mantel design, it should make a triangular shape, beginning with the top of your anchor piece being the highest point, and the pieces and design getting smaller and wider at the bottom, to encompass the entire mantel. - Using a "themed" design is great if you have a collection of items that lend themselves to a mantel design as described. (See design with cutting boards, above.) - Leave some white space. Designers (both interior and graphic designers) talk about white space. What is it? It means leaving some empty space for your eyes to rest. It means being uncluttered. You don't want your design to be so busy that your eye doesn't know where to look. - Layer your items. Don't be afraid to lean items against the wall rather than hang them. Layer a couple of frames or pieces of art. Layer your fillers. Adding items in front of the anchor piece/s is a great look. Just be aware of the size of the fillers so that they don't cover too much of the object. :-) - These tips work great for any surface. So if you have a buffet, entertainment center, dresser, or any surface for that matter, follow these rules of thumb and create a gorgeous design with items that you love. Happy decorating! ~Kerri Your DIY Decorator Photo credits to: tidbitsandtwine.com, thehappyhousie.porch.com and home.tvizlehdi.com I love to find a bargain! I mean I REALLY love to find a bargain. And I'm always on the lookout for great décor for little money. I'm sometimes surprised at the places I come across great items. And it's so much fun to stumble across unexpected treasures. Since I've had some good luck, I thought I'd share with you my top 5 places to find home décor on a budget.
5 Best Places to Buy Thrifty Home Décor: 1. Online/apps - Just about everyone knows about eBay, Craigslist and Facebook Marketplace. But there are lesser known virtual markets where you can find great deals on home and garden items. It seems that apps are popping up weekly for virtual shopping. OfferUp and Letgo are two of the most popular apps buyers are using today. There are others like 5Miles, Trove Market, Dealo and Varage Sale that are also making their way onto consumers' phones, making it simple to find great deals on just about anything. 2. Thrift shops - I admit that some are better than others, but you never know what you'll find. Thrift shops and second-hand stores like Habitat for Humanity's ReStore, Goodwill, Savers and Salvation Army have been around for years. Typically retail outlets like these take in donations from the public and proceeds from sales of these items are used to fund non-profits. Places like these are a hit-or-miss. If you're looking for something specific, you may or may not find it. But with donations coming in daily it's best to check in often, and you may even ask when their sales are to get even better deals. Since items are mostly second-hand, pieces may need a little TLC to make them functional or pretty again. If you're not averse to a little DIY, you can really score at thrift shops by finding some great quality items. 3. Discount stores - These retail outlets are likely to carry some of the trendy styles, but lower quality items. Stores like Christmas Tree Shops, Big Lots, Ocean State Job Lot, and even some of the dollar stores have a variety of smaller items at much lower prices than you can find them at some of the higher end stores. If you're looking for home décor like baskets, glassware, wall art, or other small items, you'll find a huge selection of new items. For pieces like these, you'll be able to put together a beautiful look without spending lots of money. You really don't need to spend a fortune on accessories that won't get a lot of wear and tear. Although the quality may be lower than that of Pottery Barn or Restoration Hardware, chances are you can get the same look and spend only a fraction of the amount. 4. Home improvement and big box stores - Although we think of Home Depot and Lowes as a place where we buy paint, lumber, maybe even appliances and small items like lightbulbs and hardware for fixes around the house, you can also find a variety of home décor items at reasonable prices. Drapes, lighting, rugs, drawer pulls and all sorts of items for DIY projects are available. Wholesale clubs aren't just for buying giant canisters of coffee or tons of diapers either. Many of these warehouse big box stores also carry outdoor furniture, rugs, throw pillows, artwork and other home and garden items. And if you're a member, you pay less than the general public. 5. Retail stores (sale/clearance sections) - The sale and/or clearance sections of home goods stores offer some great deals. Items that may be out of season, slightly damaged or just plain not very popular with consumers are marked down for quick sale. Home goods stores aren't the only retail stores where you can find items on clearance. Either in-store or online, stores like Target, Macy's, Pottery Barn, Kohl's, Ikea, World Market and so many others, have sale/clearance areas. If you wait until the middle or end of a season, you're likely to get the best deals on seasonal items. And if you shop online, you may have a wider selection, or be able to find items that aren't available locally. Accessories and smaller décor elements are easy to change out for a different look in your home. Why spend lots of money on these items when you may switch your colors or theme regularly? Just my two cents. 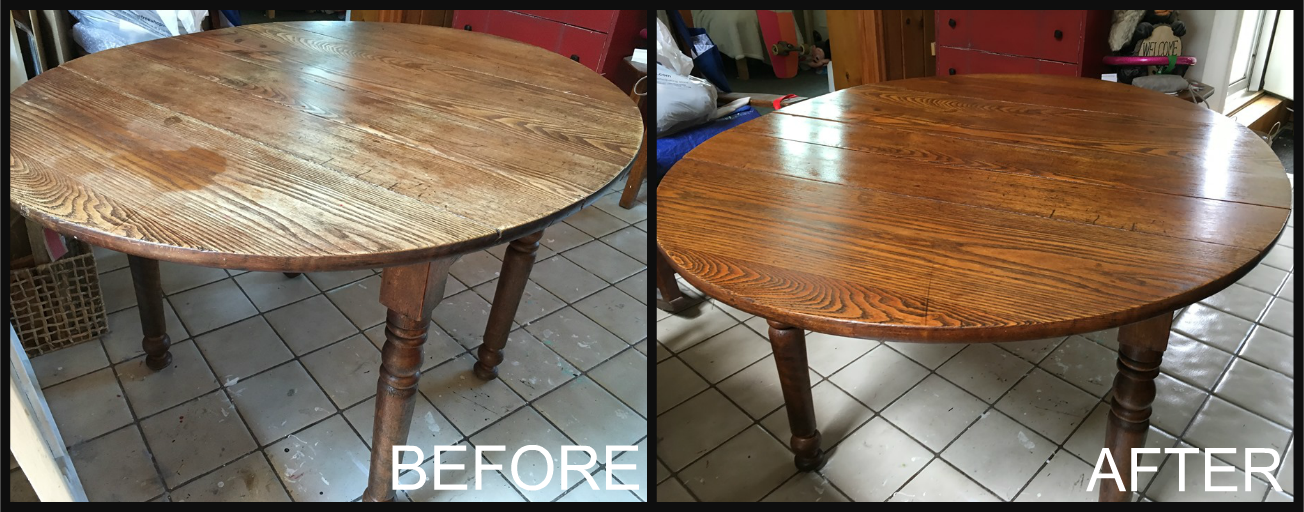
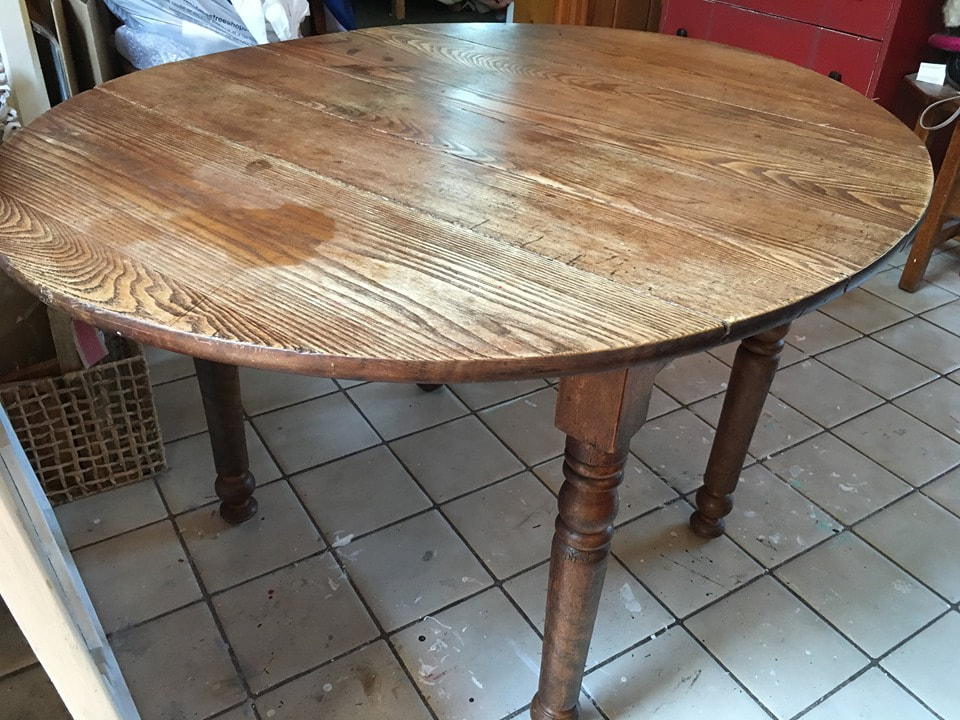
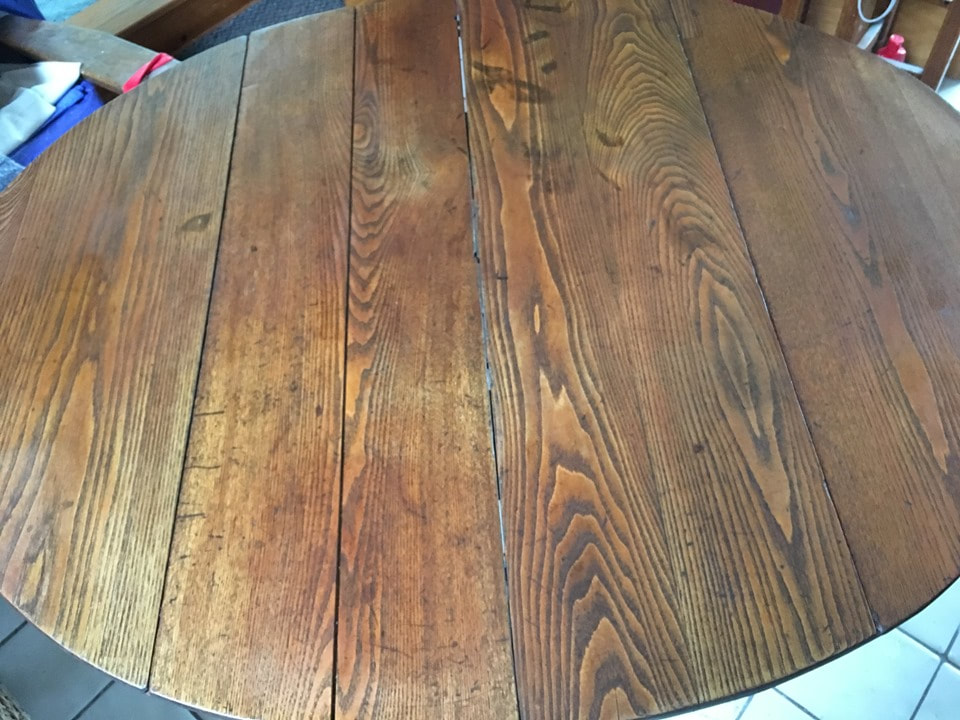
Have you ever refinished a piece of furniture? Well, I haven't. Not in the sand-down-to-raw-wood-and-restain-it type of way. I like to paint furniture. And when my client asked me to refresh this table she was gifted, I have to admit that I was a little bit scared–especially after she told me that it was about 100 years old. Yikes! She had been a client of mine for about a year and I've been to her home numerous times picking up furniture pieces to paint for her. So when she told me that she'd like me to refinish an antique table, I thought, 'No problem!' Until she gave me all the details. She told me that she didn't want it painted. Ok then. Did she want it re-stained? If she did, I have some contacts I can refer her to. Nope. Then what did she want? She really didn't know, but she did know that she didn't want it painted or re-stained. So I told her that I could clean it up and make it look new again. I thought, 'OMG, I can't ruin this table!' So my research began... I wanted to find a way to do this without having to strip or sand, but also that resulted in a beautiful finished product. Here's what the table looked like before I touched it.
There were lighter spots and darker spots (I assumed that they were water stains) in the wood. The table is very sturdy and there were really no deep scratches or holes, so overall, it was in pretty good condition. Now to get to work.
Here's what I used from start to finish (Links to the products are at the bottom of this post.): - Cotton rags - Super Fine (#0000) steel wool - Murphy's Oil Soap - Howard Restor-A-Finish (Natural) - Howard Feed-N-Wax The first thing I did was use Murphy's Oil Soap and a wet rag to wash the entire piece. By doing this, I was able to wash off any surface dirt and oil. Next–and I was really nervous about this part–I took some super fine steel wool and dipped it into Howard's Restor-A-Finish and started scrubbing (WITH the grain. Always WITH the grain). I started slowly because I was afraid that I'd leave scratch marks on the table. But the wool is so fine that it didn't leave any marks. I kept dipping the wool into the product to be sure my wool didn't get dry, and I finished the entire table. It took a little elbow grease–and I probably could have used more to get down deeper into the wood, but it did strip off enough of the finish and get the grime off the table. Every so often, after finishing a small area, I'd take a wet rag and wash away the dirty Restor-A-Finish from the table so it didn't seep back into the wood.
Here's an in-process shot. You can see how many of the stains have been removed. The grain of the wood and some of the wear is still there so I did work on it a bit more after I took this picture to try and remove the remaining stains. (I later decided that the very dark stains must be burns in the wood because they just would not clean up.)
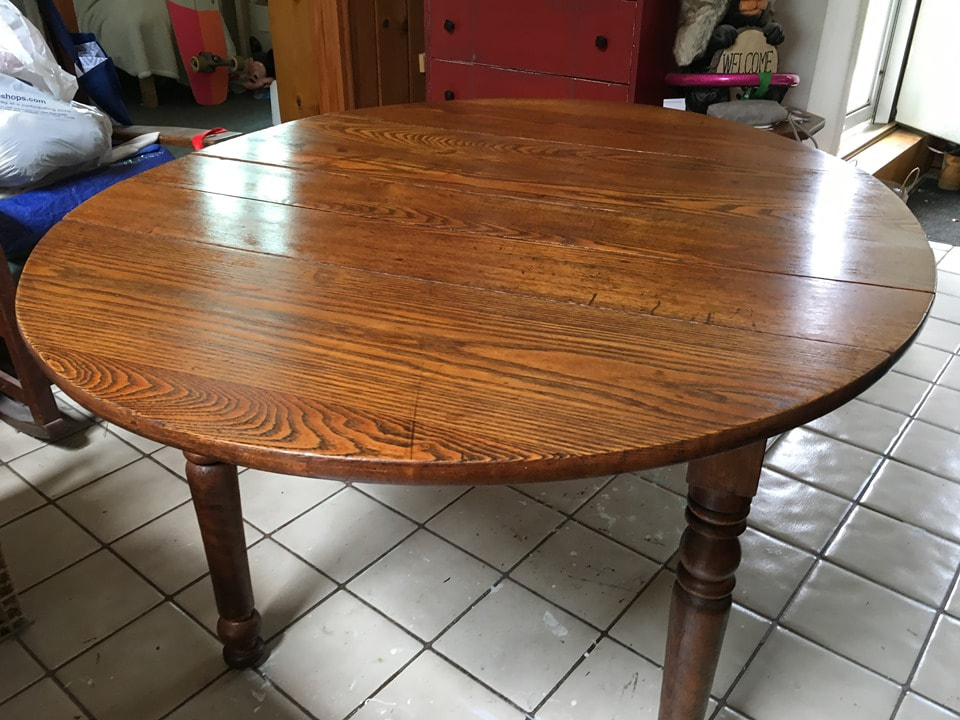
If I had used my hand sander on the table top the stains would all be removed, but I don't have the ventilation in my work area to do the deep sanding that's needed. In any case, I got the table to a point where I was happy with the result. The last step was to seal the table with Howard's Feed-N-Wax. It's a wood polish and conditioner that contains beeswax and orange oil. Again, I used a cotton rag and rubbed the wax on very liberally. It's very greasy and has a consistency of petroleum jelly. After leaving the wax on for about an hour, I took a clean rag and wiped off any excess that sat on top of the table. I let the table sit overnight before I took yet another clean rag and polished the table. And, voilà, the finished product!
I'm so pleased with the result! It's G-O-R-G-E-O-U-S! And now I know that there is a way that I can refresh a wood piece without worrying about stripping off the finish and sanding down the whole dang thing. Of course, there are cases where stripping and sanding would be the best option but this is a great process that can be used on a case-by-case basis.
I'd love to hear what you think, or whether you've used these products (or others) and what your results were. Happy decorating! ~Kerri
Products include affiliate links. I may receive a small fee for each product purchased, but you will not be charged any more for any of the products.
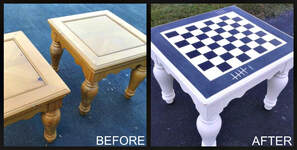 Woohoo! It's yard sale season! It's one of my most favorite times of the year, even though it also marks the beginning of allergy season for me. LOL! But in any case, you'll find me out there (with a dose of antihistamine) shopping for treasures. There are so many amazing things you can find at yard sales! It's incredible the items that people have and are willing to let go for short money. And when you live in an area where there are town-wide sales (like my area), or other organized multi-dealer sales, it can get overwhelming. So I've put together some tips that you can use to keep your sanity AND find some great treasures during yard sale season. 1. Make a list - Know what you're looking for so you don't get distracted. If you have a plan, it makes things easier to navigate–and you may not buy things you don't need. (Let's get real. You still may do that, but at least you're trying to control yourself. LOL) 2. Have measurements - If you're looking for furnishings, know what size you need. Remember, there are no returns at yard sales, so be sure your pieces will fit properly. 3. Bring some tools - A tape measure is a must! (Shoot me a note at [email protected] for a FREE compact one to take shopping.) If you have extra batteries, pack them up to try out any battery-operated items. Fabric samples to match as well as photos of your space/s will also help you to visualize a piece in your room. 4. Map a route - Find the addresses of the homes you want to shop and map out an efficient route so that you don't waste time driving back and forth. 5. Dress comfortably - Layer your clothing so that you can add or remove clothing with a change in weather. Comfortable shoes are best since you may be walking around items, through grassy areas, or just plain doing lots of walking. 6. Go to the bank ahead of time - Be sure you have lots of small bills and quarters. Homeowners may not have a lot of change, especially in the early hours. 7. Pack a snack - You may be out for a while, so I suggest bringing something to snack on as well as some water to keep you hydrated. 8. Bring the big truck - Bring the big car/truck in case you find a large piece. It will save you from having to go back to the house for pickup later. It's not a bad idea to keep a moving blanket and some straps (if you have a truck) to transport your pieces safely. 9. Shop early - In order to get the best pieces (which naturally sell quickly), start early. 10. Look past the "ugly" - If you find an item that is well-made, have great bones, and could function well for your needs, don't dismiss it because it's scratched, painted an awful color, or has stickers all over it (true story!). With some work, you can uncover and create a great piece. Happy shopping! 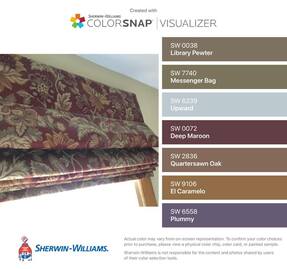 I'm going to tell you something that you may not know. In fact, you may want to argue with me about it. But, believe me, it's the truth. Your wall color should be one of the last things you choose when decorating. Yup, that's the truth. Why? Well, it's much easier to choose a paint color that matches or complements your furnishings than the other way around. Paint can be tinted to an endless amount of colors. But have you ever tried to find just the right color fabric for a sofa, or window treatments, or a rug that coordinates with your wall color? Talk about frustrating! If you're redesigning your entire space, it would make sense to choose all fabrics and colors together. But wait until you've chosen your color palette before you go to the paint store. Then it makes sense to bring samples of your items and fabrics to match. If you're redecorating over time, but anxious to paint your room, contain your excitement. You'll be happy that you did. As you know, I'm a big supporter of recycling and upcycling items to use as home décor. I talk about it all the time. I share tips, tricks and projects. And I advise my clients to use what they have before purchasing new furnishings and décor items. So, in honor of Earth Day this month, I thought it was a good time to get deep on this subject.
There are so many ideas, but I'm going to share with you my five favorite no-cost/low-cost and eco-friendly ways to decorate your home. 1. Shop in your house - Chances are, you have décor and furnishings in the attic, the basement, and even in closets that you've forgotten about. Do a sweep of your house to look for pieces that could be used where you need a functional item. Think out of the box and forget how a piece was designed to function, but think about how it could function. 2. Thrift shops, yard sales, online sites - You can find some great items for short money from these sources. There are people who are just looking to clean out their homes and therefore price items very low. These are also the perfect places to find vintage furniture. Antiques are typically well-made and very sturdy. If a piece is structurally sound, but isn't very pretty, look beyond the "ugly" and think about how a coat of paint or refinishing could freshen it up. 3. DIY décor - Get creative! Pinterest is my favorite place to find ideas. Do a search for an item that you have or that you need and see how many ideas pop up. It's amazing how much lovely décor can be made with what you have lying around the house. Artwork can be made very easily by framing beautiful calendar photos, maps or even a scrap of fabric. Glass pickle or mason jars can be spray painted and used as vases. Or an old cutting board can be painted with chalkboard paint and become a message board for the family. The possibilities are endless! 4. Natural elements - Nature offers so many treasures. Pinecones, pebbles, shells and sea glass make great fillers for vases or candleholders. Glass pickle jars or mason jars can be spray painted and used for vases. A piece of driftwood is a nice piece of table décor. And, of course, if you have a garden, fresh flowers always bring beauty into a room. 5. Swap with friends - We all get tired of our own décor at some point. Before you take a trip to the second-hand shop to make a donation, call up some friends and see if they're ready to do the same. Have a girls' night and ask everyone to bring several pieces (or pictures, if the items are large) and swap your less-than-loved items. You can create a new look and help your friends do the same. In exactly five days it will officially be spring! Yay! Winter is so freakin' long in the northeast, isn't it?! With the extra hour of daylight and the warmer temperatures this week, I'm motivated to refresh my house and start some projects.
I get so excited that I get overwhelmed thinking about all of it. So I have to slow my roll and make a plan. I'll lay it all out for you if you're feeling the same way. Follow my Facebook page for step-by-step details in the next couple of weeks to stay on track freshening your home. When you have a plan to follow, the tasks at hand aren't so overwhelming. But here are the main categories. 1. Declutter - It's tough to get anything accomplished when your house is cluttered with stuff. Marie Kondo's KonMari method is a whole-house approach to determining what will stay and what will go. I'll outline her process over on Facebook. 2. Clean - Once everything is put away it's easier to clean, vacuum and polish surfaces. I'll share a checklist on Facebook to keep you on track. 3. Redecorate - Using light colors and fabrics makes your home feel lighter and airier for the upcoming warmer seasons. You may have pieces that you love and may want to incorporate some newer, trendy items this year. On Facebook, I'll be posting an entire plan to get just the right look and function for your space. If you're a fan of Instagram (gotta love the gorgeous pics!), you can find me here where I also share beautiful photos, ideas and generally what's happening in the world of decorating. My website is where you can see some of my own projects. If you like my style, please spread the love. The more people I can help, the better. ;-) Your DIY Decorator, ~Kerri It's ALMOST spring!!! With the mild days and sunshine, I'm getting the itch to start making some changes in my home. How about you?
I'll be participating in the 2019 NH State Home Show in Manchester, NH from March 8 - 10, so I'm sure lots of people have the same itch because I've heard that they're expecting about 6,000 attendees to the show! Before making changes, it makes sense to do some spring cleaning and decluttering. But before the real work begins–and while the temperatures are still too cold to open up the windows–there are some smaller things that I like to do first to prepare for the "big clean," like: 1. Change batteries in smoke and carbon dioxide detectors. 2. Make small, inexpensive repairs that have been nagging at me (like tightening the knobs on my cabinet doors!). 3. Pull together all of the gloves, hats and scarves and give them a good wash before putting them away for the season. 4. Locate any spring/lighter bedding, window coverings, tablecloths, kitchen towels, and accessories that I can find. Make my "Keep," "Donate," "Trash," and "Yard Sale" piles. 5. Check my supply of cleaning solutions and materials and make purchases so that I'll be fully stocked in the case that one day I will just decide it's time to start cleaning. How do you prepare for spring cleaning? I'd love to hear about any tips you have. Follow my Facebook page and/or Instagram account where I'll go into more detail on spring cleaning, decluttering, redecorating and so much more. Join my email list for monthly updates, tips and helpful information on all things home! ~Kerri Your DIY Decorator Yay! It's that time again!
Whether you'll be using it yourself or renting it out, there are certainly some things that will need to be done to your summer home or AirBnB. Here are the top 5 categories that need to be addressed: 1. Cleaning - You are going to want to give the entire space a good cleaning to remove the cobwebs of the off-season. 2. Repairs/Maintenance - There are undoubtedly small things that need fixing. Maybe a lightbulb or two needs replacing. Perhaps checking the air conditioner filters. Or even testing/changing batteries on the smoke and carbon dioxide detectors. 3. Decorating/Staging - You may want some new furnishings or décor for your space. Soon all of the newest summer items will be on the shelves, so starting early will give you first pick of the latest styles. 4. Photography - Even if you don't rent it right now, you may want some lovely photos to show off, or for future use. But beautiful (even professional) photos to attract renters is imperative! 5. Marketing - Primarily for rentals, you'll want to be sure that you market your rental properly. Find out who your target audience is and where they look. Real estate agents who specialize in rental properties can definitely help in that area and do all the work for you. Follow my Facebook page and/or Instagram account where I'll go into more detail on each of these categories and offer checklists to help you keep it all organized. Join my email list for monthly updates, tips and helpful information on all things home! (Just shoot me an email at [email protected] with the subject line "Add me.") |

